The BBC and Master Computer Public Domain Library
John Ilsley. Continuous Alarm
Continuous Alarm By: John Ilsley (27N).
Welcome to the third part of this series of electrical projects, I hope all of you who attempted the last project managed to achieve the required results. If you didn't, then please inform me, and I will attempt to explain what has gone wrong, be it my own fault or yours. Anyway, back to the matter in hand. This months electronic project as outlined at the end of last months project is an alarm that will remain quiet until the two contact wires are touched, then as soon as those two wires are touched, the alarm will sound. Now, thats quite normal, because that is how a simple door bell works, you push the button, this makes two pieces of metal make contact which completes the circuit, this then makes the bell ring and when you release the button, the two pieces of metal break contact and the bell stops ringing. This project has an additional advantage in that the bell continues to sound even after the button is released. It will basically remain on until the unit is switched off then on, or until the battery runs out.Please note, whilst I have made every effort to make this an interesting and informative article neither 8BS, the editor or myself will accept responsibility for any damage caused to yourself, other persons, components, belongings or other equipment used in conjunction with this project.
The components you will need for the alarm are as follows.
R1 = 1 * 1k (1000ohm) 5% resistor
R2 = 1 * 1k (1000ohm) 5% resistor
R3 = 1 * 1k (1000ohm) 5% resistor
Th1 = 1 * C106D thyristor
Bz1 = 1 * 6 volt buzzer
BT = 1 * 9 volt radio battery or power supply unit (PSU) and leads
Veroboard = 8 holes across * 5 tracks
22swg multicore sheathed wire, solder, soldering iron etc....
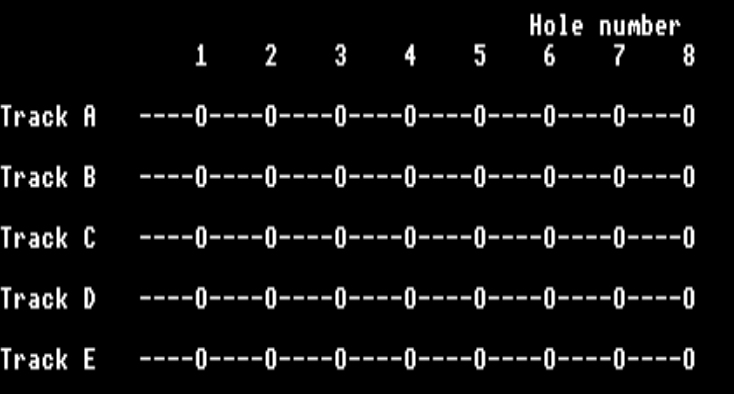
First the veroboard. Place it so the tracks are face down running left to right, similar to this:- NB( the 'Os are HOLES, '----' are tracks).
 Ok, you've either been to the shop, or you've
found the stuff lying in
the workshop if your lucky, please don't take the parts
from your family stereo
system, otherwise you may find yourself in trouble
because someone won't be
able to listen to their "Barry Manilow" or
"Des O'Connor" records!... And you
wouldn't want that now would you?!... I'm 21, and
don't get much money, so
owing to the extremely high cost of this project, I
suggest you 'borrow' the
parts from a BROKEN piece of equipment or ask a friend if
they have what you're
missing.
Building the project.
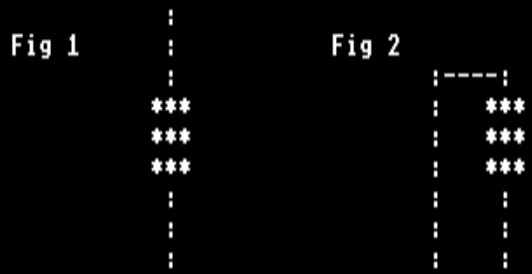
Now comes the fairly easy bit, This project is as easy to build as last months project as it has a similar amount of components. First we need to put in the resistors. These are very easy to put in and are not affected by heat from the soldering iron too much, take one of the three resistors and hold the body with one leg pointing up, and the other leg pointing down, I suggest you only try this if you are a contortionist, as in fig 1. Using your thumb, bend the top leg over so it faces down, as in fig 2. Example... Now do exactly the same with the remaining two
resistors. Now you have
done that, we must place each of the resistors onto the
veroboard so that we
start our circuit. Hold the veroboard with the copper
strips facing down, and
running left to right. Take one of the resistors, R1, and
place one of the legs
into hole A2 and the other leg into hole C2, now solder
it into place. Take the
second R2, resistor and place one of the legs into hole
B3 and the other leg
into hole D3, and solder that one in. Now take the
third and final resistor,
R3, and place one of it's legs into hole D2 and the other
leg into hole E2 and
finally solder that one in place. That is now all the
resistors fitted. You
should have all the resistors fitted nicely, with no
problems.
Now take the thyristor, Th1. This is not exactly sensitive to heat, but it is best when you come to soldering it in not to leave the soldering iron on the legs for too long. Hold the thyristor with the legs facing down and the metal tab to your right, (facing hole 8). Place it in the veroboard so that the metal tab faces the right, and the leg furthest away from you is in hole B5. Thereby the other two legs will fit snugly into holes C5 and D5 without any problems, now solder it into place. The leg in B5 is the CATHODE, the leg in C5 is the ANODE, and the leg in D5 is the GATE.
That is all the components soldered in by now, all you have to do is add the power cables, and a few other wires, so lets carry on. Find two lengths of wire of about six inches in length, strip and flux both ends of both lengths of cable, and name one length 'A', and the other 'B'. Place length 'A' into hole A1, and solder it in, and place length 'B' into hole E1, and solder it in. These two wires when touched together make up the trigger. Now take the buzzer Bz1, I don't call this a true component as it isn't fixed into the veroboard as such. However, take the red or positive (+) wire of the buzzer and if necessary strip and flux the end and place it into hole A7, and solder it in place. Take the black or negative (-) wire of the buzzer and if necessary strip and flux the end and place it into hole C7, and solder it in place. All that is left to do involving the construction of the circuit is to add the power. So take the power leads, these can be the normal 9volt battery connecting terminals, or a separate power supply, which ever you choose. Place the red or positive (+) wire into hole A8 and solder it in, and now place the black or negative (-) wire into hole B8 and solder it in place.
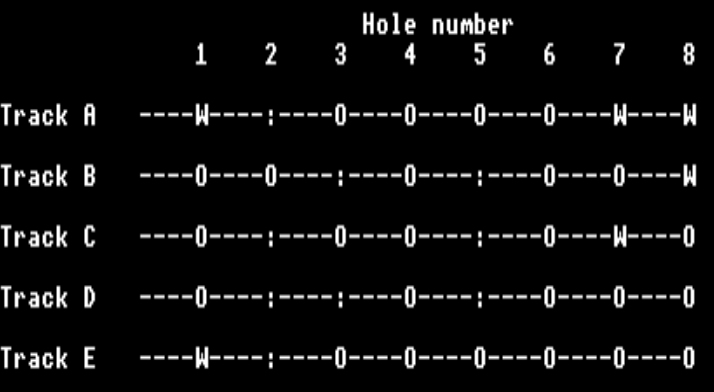
You should only have components or holes in the same places as the diagram below. If you don't, then check you haven't done anything wrong. If you haven't, then it means I have most likely made a mistake in my text, for which I am sorry. But I have read it all back, and it seems all ok too me. Now check that all your solder joints are clean and tidy and that no solder is bridging or going onto any of the other tracks and that all the components are in the right places. Below should give you an idea of where leads should go. The ':' are components leads, the 'W' are wires. Now you can plug your battery onto the battery lead, or turn on your PSU.
Key - : = where a component is fitted.
W = where there is a wire fitted.

TESTING
The buzzer should be quiet, if it starts buzzing, then check (1), that the wires in holes A1 and E1 are not touching each other, or (2) that Th1 is fitted the correct way around.If the buzzer is silent, then take the leads from holes A1 and E1, and touch them together, the buzzer should sound. If it doesn't, then check
(1) the buzzer is fitted the correct way around.
(2) the thyristor is fitted the correct way around.
(3) the power is turned on.
If the buzzer was silent until you touched the wires from A1 and E1 together then so far everything is ok. Now disconnect the two wires, the buzzer should continue to sound. If it does, then all is well, and you can stop the buzzer only by turning the power first off, then on. However, if the buzzer stops buzzing as soon as you break the contact of the wires from A1 and E1, then check
(1) that R1, R2 and R3 are in the correct place.
(2) That there is no bridge of solder between the legs of Th1.
OTHER THINGS TO TRY WITH THIS
You can lengthen the wires from A1 and E1 and instead of the two bare wires making contact, you can place a touch sensor or pressure mat on the connections to say tell you when someone enters the room or house, or to tell you if your pet dog is lying in his box. You could, however ( I don't suggest this unless you have the necessary skills use a similar pressure idea) use it to tell you if a pressure boiler is about to surpass it's limits.You can also have it so it will automatically reset itself if you use a 555 timer chip. These will be explained and used in a later project.
HOW IT WORKS
So how does this work? Well, if I knew I would tell you... Sorry I mean it's so simple, even a baby can understand it... I'm a big baby, and I understand it...Well, first of all the thyristor works in a similar way to a normal transistor, in that a small current flow to the GATE causes a much larger flow from the ANODE to CATHODE. Those last two work in the same way as a normal diode in that they allow current to flow only one way. But once a small current is fed to the GATE, and the ANODE and CATHODE allow current to pass from one to another, they are basically glued open until the power is cut to them.
R1 is there to prevent the thyristor being blown to bits should aliens strike. I mean R1 is there to help prevent the thyristor being blown up if too much current is passed to it. R2 is there to prevent accidental trigger happy thugs activating the buzzer, for example, your static electricity and airborne signals. R3 is there so that when the trigger is finally activated, there is power for the thyristor when the trigger wires are disconnected.